Close this page to return to AngelWeb.
The Salvation Army
Frequently asked questions about our using the AngelWeb site.
NEW: videos - Training and How-to and Using the new Enhancements
NEW: Known Browser issues when using something other than Microsoft Edge or Internet Explorer.
Frequently asked questions about accessing and configuring the site:
- Why do I still get a warning message about client appointments when I have set it up?
- What login does a Corps Officer use to log into AngelWeb? Can I create other logins?
- What will be loaded for my Corps?
- What setup / configuration options are available for each Corps?
- What additional configuration should be completed once the initial configuration for my Corps is completed?
- How is Income Validation configured?
- How is Preregistration setup and used?
- Printing Ethnicity. I want to include this for each angel instead of by family as sometimes this is different. What options do I have?
Frequently asked questions about working with the Menu reports (Excel version 2003).
-
Everytime I try to open one of the reports, I get a warning message. Why does this happen and is it ok to open the report?
The file you are trying to open, 'name.ext', is in a different format than specified by the file extension.
Verify that the file is not corrupted and is from a trusted source before opening the file. Do you want to open the file now?
-
There is a comment on the report page that says it is faster to download and open as two steps. What is that about?
Your report file has been successfully created.
Right click on this link and select Save Target As to download the file to your PC.
NOTE: it may be MUCH faster to download (Save As) and then open the report from your hard drive (two steps), rather than launching it here!
Or click on the link to launch the file in Excel:
Frequently asked questions about Printing Angel tags.
- What are the steps to print Angel tags and other reports? How does this work?
- Do I have to use Microsoft Access? What versions are supported? What about 64-bit office versions?
- Where can I order the blank Angel tag forms?
- Can I print on single tags or lables that I already have on hand?
- What are Floor Sheets and Bag Reports?
- What are the other Corps specific reports on the reports page for?
- What are the setup options on the Reporting program and how are they used?
- Some Corps have customized logos on their Angel tags to thank their local sponsors. How is this done and what does this cost?
PowerPoint 'How To' demonstrations.
How to configure Client Appointments.(Right-Click,Save Target As)Angel Web Training Guide.(Right-Click,Save Target As)
Working with History and Life Skill classes.
How to keep track of Bikes and Large Boxes as they are received at the warehouse.pdf
How to track bags as they are received at the warehouse.pdf
Working with Preregistration appointments, setting up appointment times, importing applications
Accessing and configuring the site
Why do I still get a warning message about client appointments when I have set it up?
The system will warn the user if it finds that appointments have not been setup for an application type.
For type: Automatic, it assumes that it is the original 0 and 20000 records configures when the site is setup at the beginning of the season.
To get rid of the warnings, add a 3rd appointment record for that application type.
At the beginning of the season, there will be:
1 record of type '0' that is the starting place for counting how many applications have appointments assigned.
1 record with a number of 20000 that is used as a high number so that when the system searches for where to assign each new applicaiton, it will not 'fall off the end' of the available slots.
So. . . if it sees only two records, it is going to display that warning.
If you only have say 100 expected applicatons for a particular application type, and you want them to all show up at 9 AM on a particular distribution day
Then you shoud add one more record for that app type and date. Add a single new appointment for 9:30 and number 101. Now that there are 3 records (0, 101, 20000) the warning will not happen.
For type: Select Time, checks to see if any have been configured, so to get rid of the warning, Click on the 'Setup (this type) and either Generate or add a record.
Also, remember that the appointments are assigned by a COUNT of the existing apps of this type, not the number assigned.
So for example, if the you have configured Angel type applications to start with number 1001 and expect 200 families.
and you want to have application appointments assigned in blocks of 20 starting at 9 AM:
Your expectation is that the first 20 applications (having assigned numbers 1001 thru 1020 will be assigned to 9 AM
The next 20 (1021 thru 1040) will be assigned to 9:30
and so forth.
Remember that they still are counted 1 thru 20 and fall on the zero record - 9 AM time slot and so forth.
When the 21st application is added, it falls at the 9:30 time slot, regardless of the number assigned.
Follow these configuration steps For type: Automatic:
1. Edit the '0' record to have the correct date and time (if needed)
2. Delete the 20000 record so that the system does not complain about assigning a new number below the highest number.
3. Add a range with a starting number of 21 and a per-block of 20 for the date. Start with 9:30 in this example.
4. Continue doing blocks of numbers, taking the highest number and adding the block number to it for the next starting number.
You would do this for taking a break at lunch (stopping at 11:30 so that you have 12:00 and 12:30 unavailable.
Then next block might start at 1:00 and go to 4:30. Seeing that the last assigned number is 101,
you would enter the starting number of 121 with blocks of 20.
You would then see something like this:
[28293] DEMO Corps, Angel, 12/17/2018, 09:00 AM, - - 0
[28295] DEMO Corps, Angel, 12/17/2018, 09:30 AM, - - 21
[28296] DEMO Corps, Angel, 12/17/2018, 10:00 AM, - - 41
[28297] DEMO Corps, Angel, 12/17/2018, 10:30 AM, - - 61
[28298] DEMO Corps, Angel, 12/17/2018, 11:00 AM, - - 81
[28299] DEMO Corps, Angel, 12/17/2018, 11:30 AM, - - 101
[28302] DEMO Corps, Angel, 12/17/2018, 01:00 PM, - - 121
[28303] DEMO Corps, Angel, 12/17/2018, 01:30 PM, - - 141
[28304] DEMO Corps, Angel, 12/17/2018, 02:00 PM, - - 161
[28305] DEMO Corps, Angel, 12/17/2018, 02:30 PM, - - 181
[28305] DEMO Corps, Angel, 12/17/2018, 03:00 PM, - - 201
[28305] DEMO Corps, Angel, 12/17/2018, 03:30 PM, - - 221
[28305] DEMO Corps, Angel, 12/17/2018, 04:00 PM, - - 241
[28305] DEMO Corps, Angel, 12/17/2018, 04:30 PM, - - 261
Then add one more single record of 20000 for 5:00 PM to act as a final number.
Back
What login does a Corps Officer use to log into AngelWeb? Can I create other logins?
Each Corps has a Corps Manager login, that is the administrator for that Corps.
When your site is setup, this login and password will be emailed to you.
Each Corps Officer can create and manage the logins for their Corps so they can add or make inactive logins to give or remove access to the AngelWeb system.
When logged in as this Manager, you can also configure your AngelWeb Corps to include several options.
Back
What will be loaded for my Corps?
Zip codes from your service area will be loaded using the spreadsheet that you provided. You can add or remove additional zip codes using the link on the main menu.
Default messages for Printed Applicaitons and Angel tags, along with options for Assigning Applicaiton IDs and Appointment times, and other options will be set for you.
Please review all of the options by clicking on the link: Manage Corp/Unit Setup and verify all selections.
Back
Default messages for Printed Applicaitons and Angel tags, along with options for Assigning Applicaiton IDs and Appointment times, and other options will be set for you.
Please review all of the options by clicking on the link: Manage Corp/Unit Setup and verify all selections.
Back
What setup / configuration options are available for each Corps?
From the main menu, click on the link for: 'Manage Corps/Unit Setup' and then select your Corps name.
Select to make active or inactive options such as:
* Zip Code in Drop-Down list (used on the Application screen to fill in City, County, State.
* Automatically Assign Appointments.
* Assign Client ID
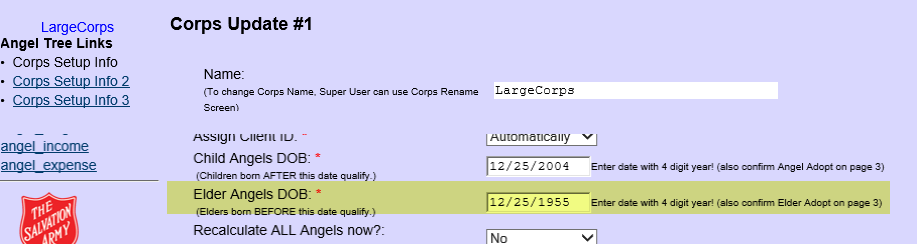
* Child Angels DOB: (Children born AFTER this date qualify.)
* Elder Angels DOB: (Elders born BEFORE this date qualify.) See details on workin with Elder Angels
* Hide Food Only Apps Question (show or hide the option to create Food Only applications.
* Family based optional questions (7 available) with DDLB (drop-down ListBox) answer choices.
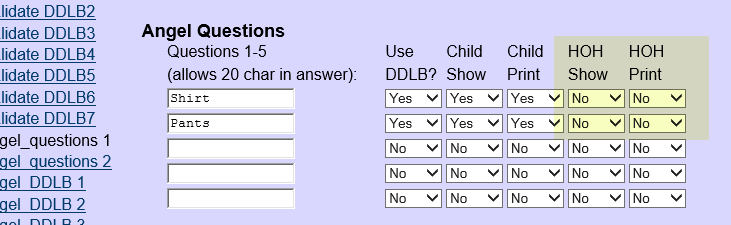
* Angel_Clothing_Questions allows up to 5 clothing type questions (Pants / Shirt / Shoes).
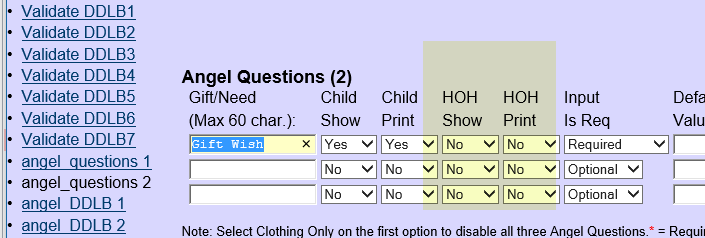
* Corps Application Types :: Configure allows up to 3 'fill in the blank' type questions for Gift Request and Child Need.
* angel_msg1 holds the text that will be printed on the Application.
* angel_msg2 holds the text that will be printed on the Angel tags.
* Income / Expense holds up to 10 categories for recording the family Income or Expenses if used to qualify for Angel Assistance.
* Note: The age of the Angel is calculated based on the date the applicaiton was entered.
since it will continue to use the date the applicaiton was entered into the system for all of the angels.
When printing Angel tags, there is an option to print the Angel age as of either Christmas day or the application date.
Back
Select to make active or inactive options such as:
* Zip Code in Drop-Down list (used on the Application screen to fill in City, County, State.
* Automatically Assign Appointments.
* Assign Client ID
* Child Angels DOB: (Children born AFTER this date qualify.)
* Elder Angels DOB: (Elders born BEFORE this date qualify.) See details on workin with Elder Angels
* Hide Food Only Apps Question (show or hide the option to create Food Only applications.
* Family based optional questions (7 available) with DDLB (drop-down ListBox) answer choices.
* Angel_Clothing_Questions allows up to 5 clothing type questions (Pants / Shirt / Shoes).
* Corps Application Types :: Configure allows up to 3 'fill in the blank' type questions for Gift Request and Child Need.
* angel_msg1 holds the text that will be printed on the Application.
* angel_msg2 holds the text that will be printed on the Angel tags.
* Income / Expense holds up to 10 categories for recording the family Income or Expenses if used to qualify for Angel Assistance.
* Note: The age of the Angel is calculated based on the date the applicaiton was entered.
since it will continue to use the date the applicaiton was entered into the system for all of the angels.
When printing Angel tags, there is an option to print the Angel age as of either Christmas day or the application date.
Back
What additional configuration should be completed once the initial configuration for my Corps is completed?
Verify that the Zip Codes for your Corps service area are correct. Use the link on the main menu: Zip Codes for service area.
Configure the dates and times for families to return to pickup their Angel bags (toys and clothes).
Follow the link: How to configure Client Appointments.
Back
Configure the dates and times for families to return to pickup their Angel bags (toys and clothes).
Follow the link: How to configure Client Appointments.
Back
How is Income Validation configured?
There are three available options for income validation.
1. Income and Expenses (entered as monthly amounts).
To qualify, Income has to be less than expenses.
It includes the three financial Allowance that can be used to offset Income.
* Financial Allowance per Family
* Financial Allowance per Child
* Financial Allowance per Adult
2. Income vs. Federal Poverty Guidelines that you configure on the Income setup screen.
This takes the number of people in the household, as entered on the family screen, and multiplies this by a per person amount + a base amount to determine eligibility.
3. External qualification (setting it to No means everyone who applies has already been qualified thru some other means.
Back
How is Preregistration setup and used?
Preregistration must be activated by adding a code on Corps Unit Setup info 3
03 Appointment must be active
Appointment Site code must be entered and be unique across all sites on AngelWeb
The public facing URL is: http://www.pwhdev.net/AngelWebSQL/loginangel.html
For more information, follow the link: How to actvate and use Preregistration.
Back
03 Appointment must be active
Appointment Site code must be entered and be unique across all sites on AngelWeb
The public facing URL is: http://www.pwhdev.net/AngelWebSQL/loginangel.html
For more information, follow the link: How to actvate and use Preregistration.
Back
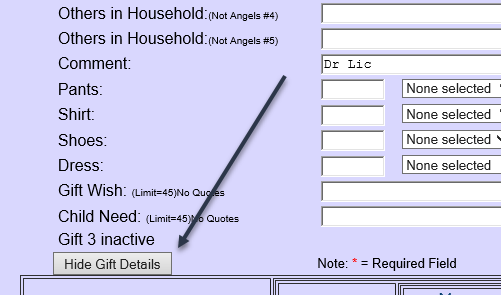
Working with Elder (Senior) Angels.
To enable clothing and gift requests for Seniors on the HOH screen:
(So that the HOH will be downloaded to the Angel Printing program)
(So that the HOH will be downloaded to the Angel Printing program)
- Go into Corps Unit Setup and turn on the options for clothing and gift requests for HOH
Enable Clothing input for the HOH screen
- Enable Gift request input for the HOH Screen
- Also verify on the first page the DOB for elders is correct
- When your configuration changes are complete, logoff and back in.
- Now, when a senior is the HOH, you can toggle on the gift requests for that record.
(This will eliminate the need for entering the senior a second time as angel.)
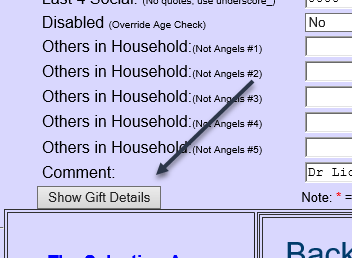
Reveals the gift request fields for HOH
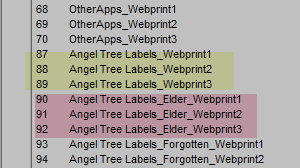
- After downloading, use the separate reports for printing Angels and printing Seniors
Setting up a separate application type for Corps and Training.
resetting your applications back to 1 after training.
How to setup a separate application type for Corps families or do Training
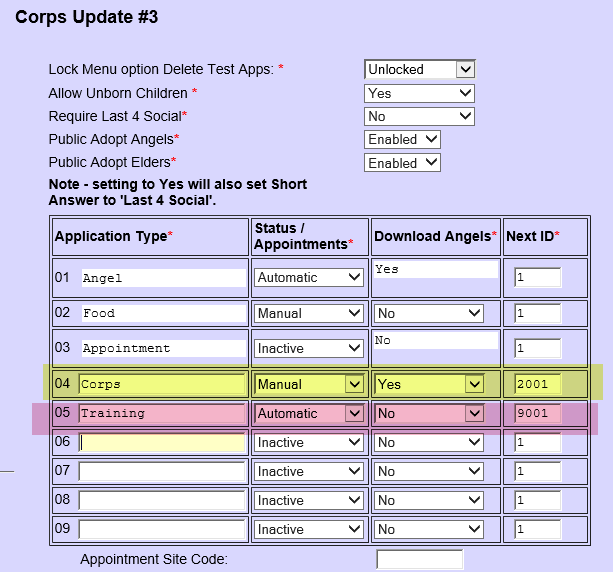
If you want to separate your Corps applications from others, you could add a new application type called Corps and give it a starting number like 2001.
(As long as your expectation is that you wont have more than 2000 Angel type applications)
This will make it easy to tell the difference between them when sorting Angel Tags and Bags
- Set the Status / Appointment indicator to Manual if you will just type in an toyshop pickup date and time.
- Otherwise, set it to automatic and then build the automatic appointments like is done for Angel.
- NOTE: the appointment calculator does not take into account other application types
So, if you are using Automatic assign and had configured 10 for 9 AM for Angels and 10 for 9 AM for Corpson the same date,
you could potentally have 20 show up if both had applications. - In the same way, you could create an application type of Training and build appointments
- Make it some other date than real appointments just for clarity.
- Give these a starting number of 9001 to make it real obvious that these are training.
- When you are done with each block of training, go in and delete them one at a time from search HOH to ensure that they dont get downloaded later.
- If you used your regular Angel application type for training, when done and ready to take live applications:
1. Open each existing application from the Search by HOH last name screen and delete each one till they are all removed.
2. Go to the Manage Corp/Unit Setup screen and then the Corps Application Types page
3. Reset the starting number to 1 so that it starts numbering from there for your live applications.
Frequently asked questions about working with the Menu reports (Excel version 2003).
Everytime I try to open one of the reports, I get the warning message:
The file you are trying to open, 'name.ext', is in a different format than specified by the file extension.
Verify that the file is not corrupted and is from a trusted source before opening the file. Do you want to open the file now?
Why does this happen and is it ok to open the report?
All of these reports are based on Microsoft's Excel 2003, which is a type.XLS document.
Microsoft underwent a big rewrite of their office suite starting with Office 2007 and continuing in Office 2010 and higher.
The new format (An XLSX document) is a more complicated file type than an .xls. and is actually type of zip file with multiple parts for the document.
So, Excel displays that warning message about a different format and you have to confirm that this is OK.
There is a way to turn off this message, but it would be for all documents and not just these reports. Please search the Web if you wish to review these instructions.
Back
There is a comment on the report page that says it is faster to download and open as two steps. What is that about?
Your report file has been successfully created.
Right click on this link and select Save Target As to download the file to your PC.
NOTE: it may be MUCH faster to download (Save As) and then open the report from your hard drive (two steps), rather than launching it here!
Or click on the link to launch the file in Excel
When you launch an Excel report in the Browser, then Microsoft Edge or Internet Explorer (or any browser) has to read the contents of the document into memory and save it into a temporary location on your hard drive.
Then it passes this location to Excel which has to read the contents again.
There is additional security in your Browser to prevent viruses from spreading, and there may also be a firewall or virus protection program that will also read the contents of the document looking for areas of concern.
When you save the file to your computer as one step and then open the file with excel as a second step, then you bypass these additional steps, so it is often 2-3 times faster to do it this way.
Back
Frequently asked questions about Printing Angel tags.
What are the steps to print Angel tags and other reports? How does this work?
After the family data is entered into the AngelWeb site, the printing process for Angel tags involves downloading a spreadsheet (.XML) file to your desktop that contains the angel data, and using a local copy of the Angel Printing
program (MS Access) to print the angel tags.
On the main menu of the AngelWeb site, there is a link on the lower right-hand side called: Download Angel reporting software
Follow this link and then SAVE the Reports program to your PC.
On the main menu of the AngelWeb site, there is a link on the lower right-hand side called: Download Angel reporting software
Follow this link and then SAVE the Reports program to your PC.
- How to download and run the AngelWeb Reports program.
- Right-Click on the link above (AngelWebRpt2016.ACCDB) and select Save Target As
- Pick a folder on your PC and let the file download.
NOTE: I recommend C:\Angel - Return to the menu and now (left click) on Download Angel Data to XML
- This will spin for a few seconds and then take you to a new page that has the generated XML file.
Note the instructions:
Right click on this link and select Save Target As (or Save Link As) to download the file to your PC.
DO NOT single click on the link below as this will just open the XML file in your browser.
The file to save will look like this: EXP_angeldata_LargeCorps-1132016.xml - Save the EXP file to the same location as you saved the reporting program -- C:\Angel
- Use Windows Explorer on your PC and navigate to the folder where you downloaded and run the Access program
- Click on Setup and confirm the Automated or Manual ID.
- Click on Import Angel and import the downloaded EXP angel data file.
- Click on Reports and run the reports as needed. For example #86 is the formatted report for two Gift/Need requests.
- How to print Angels:
- Instructions for Printing Angels (opens in a new window)
Do I have to use Microsoft Access? What versions are supported? What about 64-bit office versions?
This has been tested on MS Access 2003, 2007 and 2010.
Microsoft now supports two versions of the Office suite -- 32-bit and 64-bit.
The only place where 64-bit vs. 32-bit has been a problem in the Reporting program has been in the area of using the button to 'Find' the name of the .XML file
for Angels and HOH data. The current version has had limited testing in both 32-bit and 64-bit Office and seems to work well with both.
The work around for the 64-bit version is to copy and paste the full name and path of the XML file into the Import screen instead of using the button to 'Find' the file name.
Back
Where can I order the blank Angel tag forms?
You will want to order the pre-printed Angel forms to make the angel tag printing process much easier. You can order the tags from Trade or from Liberty Press:
- Where can I order the Angel Tags?
- You can order the tags from Trade or from Liberty Press (opens in a new window)
- --- click on Salvation Army
- --- --- click on laser tags and labels.
- Scroll down to the bottom and you will see 5 angels listed. Since the reporting program prints by number range,
most folks pick LP-71L LP-72L or LP-73L (and not the little boy or girl).
These forms are 3 angels to a page - legal sized paper.
The reporting program knows the alignment of these forms, so all you need to do is split the three angels once the printing is completed. Back
Can I print on single tags or lables that I already have on hand?
There are several reports that are designed for Avery labels.
Back
Back
What are Floor Sheets and Bag Reports?
There are several reports that may be useful in organizing for your warehouse.
Floor Sheets can be printed to mark a spot for the Family's bag of toys and clothing.
Bag reports can be taped to the outside of the bag to help identify the contents.
Back
Floor Sheets can be printed to mark a spot for the Family's bag of toys and clothing.
Bag reports can be taped to the outside of the bag to help identify the contents.
Back
What are the other Corps specific reports on the reports page for?
Some Corps have asked for customizations on various reports.
When you open the Report Selector screen of the reporting program, you will see a selection box on the right that says:
Show BASE Reports + this Corps Reports.
If your Corps is not listed, then there may be no customized reports for your location.
Change the Selection to: _Base Reports
Back
When you open the Report Selector screen of the reporting program, you will see a selection box on the right that says:
Show BASE Reports + this Corps Reports.
If your Corps is not listed, then there may be no customized reports for your location.
Change the Selection to: _Base Reports
Back
What are the setup options on the Reporting program and how are they used?
There are options available in the printing program:
From the main menu, select: Printing Options Setup (Check this before Printing)
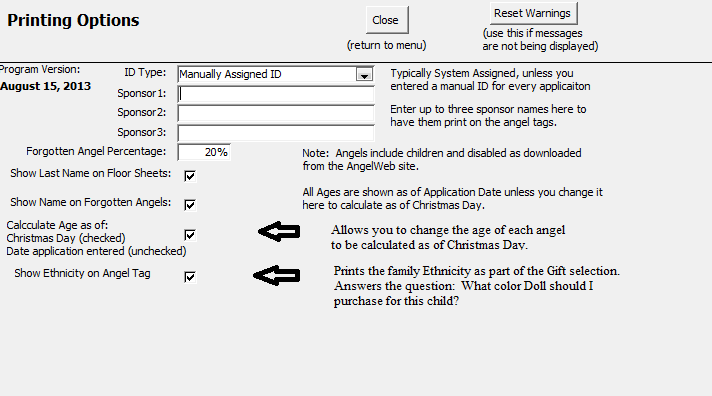
If you wish to print Forgotten Angels, then this percentage will be used to calculate how many of each age and gender based on your current number of Angels.
Only select Manually Assigned ID if your site pre assigned IDs to clients - such as in the case of taking paper applicaitons and then later entering them into the AngelWeb site.
Back
From the main menu, select: Printing Options Setup (Check this before Printing)
If you wish to print Forgotten Angels, then this percentage will be used to calculate how many of each age and gender based on your current number of Angels.
Only select Manually Assigned ID if your site pre assigned IDs to clients - such as in the case of taking paper applicaitons and then later entering them into the AngelWeb site.
Back
Some Corps have customized logos on their Angel tags to thank their local sponsors. How is this done and what does this cost?
There are a couple of options for printing Sponsor informaiton on each Angel Tag.
In the Printing Options, you can enter the name of up to three sponsors and this will automatically print on the Angel tags. There is no additional cost for this option.
If you wish to include the LOGO of your sponsors, then I can do this for you at the cost of 1-2 hours of billable time. Currently this is $45 / hour. If you have someone on staff that works with MS Access, then you can do this yourself.
Please note, that the sponsors will need to supply the logo file and it MUST BE SIZED in the below ranges:
(Unfortunately, Im not a graphics artist and dont have the software or the skills to do this.)
A horizontal logo should be on the order of 144 pixels wide, 72 pixels high
A square logo should be on the order of 150 pixels by 150 pixels.
The sponsor should supply the file in the above size to ensure that they approve the colors and resolution of the printed logo
The file should be a .PNG file (which supports transparent background) or a .JPG file
Generally speaking -- 75 pixels is about 1 inch
If you will be printing more than one logo, then, you can decide how much space you want to give to each.
You only have an area about 2.5 inches wide and 1.5 inches tall on the angel tags to print the logos.
Back
Using the new Enhancements.
Ethnicity is now selected for each child instead of only by family. Corps setup, Select Family question #3 -- Validate DDLB3.Enhancements
- Enhancements
- Pre-Registration has been improved. Pre-Registration Information
Pre-Registration Considerations Discussion on using Pre-Registration. - Copy/Paste options have been added for both Pre-Registration and for Applications. This gives you additional flexibility when not doing in-person interviews
to copy and paste the Client information into an email and interact with the client in this way. Copy/Paste Information - The login page can help you retrieve your pasword, as long as your emial had previously been saved on the User setup page.
- It is now possible to configure user logins to show Spanish Labels on the Application intake screens.
- Duplicate tracking has been improved and the system now saves DOB+First and DOB+Last. Duplicate Tracking
- Financial Override option is configurable. How to activate and use Financial Override.
- Online generation of Forgotten Angels is now available. Generate Forgotten Angels
- Ethnicity is now selected for each child instead of only by family. Corps setup, Select Family question #3 -- Validate DDLB3. Ethnicity Configuration.
- There is now an Internal Only option for Sponsors. This reduces the required fields. Internal Only option Sponsors
- The browser or choice is now Microsoft Edge. Internet Explorer still works, but Microsoft is dropping support for this. Chrome and Firefox continue to have problems on certain screens.
- The Appointment Count screen now shows the application type.
- The Setup screens for Angel Appointments have been improved with drop-down selection for times.
- There is now an option to change an application to Cancelled. The app still stays in the system but the angels will not download.
- You can now search by Gift Wish 1 / 2 / 3
- Corporate Sponsors can now add a note to an adopted Angel -- like who they assigned the angel to from their site.
- Add search capability to the 7 Family based questions (display drop-down values available for selection) to show which applications selected that option.
On the top-right-hand side of the main menu, there is a new search screen: Search by Family Question/Answer
This will allow you to serach applications with a combination of each answer to the (7) application based questions (Photo ID, Marital Status, ... )
The report: HOH by Alpha now includes thes questions and answers in the downloadable spreadsheet. - How to export all of the Angels to an Excel Spreadsheet
- Add a way to view / edit history to identify families that need to take a life skills class
Click on a link to toggle this record
Download report Click on Link - Date LifeSkill Taken - Add a way to preregister applications - a new URL that allows public input of HOH name and address.
Search screen by HOH Last for Preregister
Import Preregister as new Applications
Report/Spreadsheet showing appointment times sorted by Last or Arrival Time - Allow additional application types and then assigning appointments by the type.
For example:
01 Angel (required)
02 Food (required)
03 Appointment (required)
04 Silver Bells (or any type you may want to use)
05 Christmas Mothers (or any type you may want to use)
Use Corps Setup and then: Corps Application Types menu to add additional Applicaiton Types.
For automatically assigning appointment times for pickup - also complete the Client Appointments Setup menu
for each appointment type. - Setup option - allow unborn children Yes / No - Corps Application Types menu to not allow unborn children on the application.
Angel Printing and Reports Enhancements
- Add a way to select checkbox to reprint several angels.
Details to follow
Export all of the Angels to an Excel Spreadsheet
How to export the HOH details (ANGELHOH) or Angel details (ANGELRPT) tables from the report printing program to an excel spreadsheet.
You can then look in the spreadsheet for specific gifts (like bike requests) or other answers (like Photo ID, Marital status, or family ethnicity)
Note: There is no direct connection with the 'This child has a bike' check box (if active)
and what is typed into the gift request field. This is because there was no way to define all of the possible spellings of a bike request + size.
So if the child is requesting a bike, this also needs to be requested in the gift request.
- Open the AngelWebRpt2014.
- Import Angel XML if needed.
- Hit the F11 key to display the tables.
- Select Angelrpt,
- Right-Click and Export - to Excel (for Angel information)
- Select excel and give it a folder and name the file. It will default to angelrpt.xlsx
or - Select AngelHOH, Right-Click and Export - to Excel (For Application information)
- Select excel and give it a folder and name the file. It will default to ANGELHOH.xlsx
- Close the Angel Printing program.
- Now, open Excel.
- Navigate to the location where you exported and open the .XLSL file.
- You can delete the columns you don't want to share.
Look for the disabled flag.
0 = non-angels like HOH
1 = Child Angels
2 = Senior Angels
3 = Disabled Angels. - NOTE: The data included is the information the reporting program needs to do it's work - so you may need to:
* Remove columns that are not useful - like all of the messages.
* Sort the spreadsheet in the order you want.
* Delete some of the unneeded rows (like all of the HOH for Angels).
You can save the spreadsheet as another name to send parts of the information to other agencies.
Configuring Ethnicity options.
- Now available in 2018, Ethnicity can be selected for each child in the family.
- See the configuration setup on the Corps setup, Select Family question #3 -- Validate DDLB3. Ethnicity Configuration.
Videos
Training Videos
- 2017 - please see the below list of training and how-to videos available about AngelWeb.
- Introducing working with Sponsors and Adopting Angels (AngelWeb side) click to play
* Download: ManageSponsors.docx (Right-Click,Save Target As) - Introducing Public facing on-line Adoption click to play
* Download: Public_facing_Angel_Adoption.docx (Right-Click,Save Target As) - Setting up Client Appointments click to play
* Download: PowerPoint with screen shots - setting up Client Appointments (Right-Click,Save Target As) - Introduction to AngelWeb click to play.
- Downloading and printing Angel tags click to play.
Several commands report Angel Tree locations are limiting the number of days available to The Salvation Army as other organizations compete for access to the public for their programs.
One of the big enhancements Ive been working on is the ability to manage corporate sponsors and the option to let individuals and organizations/corporations adopt angels online and keep you and your angel coordinator updated on the status of these.
This allows both on-line adoption as well as assigning blocks of angels to org/corp sponsors.
I have a vision of allowing sponsors to shop online at their favorite site (Amazon / Walmart / ???) and have the gifts shipped directly to the Corps warehouse. Id like to work with THQ and get some buy-in from some of the larger retailers with maybe free shipping to known Angel warehouses during Angel season - perhaps include tracking information and some features like that. All of that may not be possible this year but Im trying to build a design that would allow this.
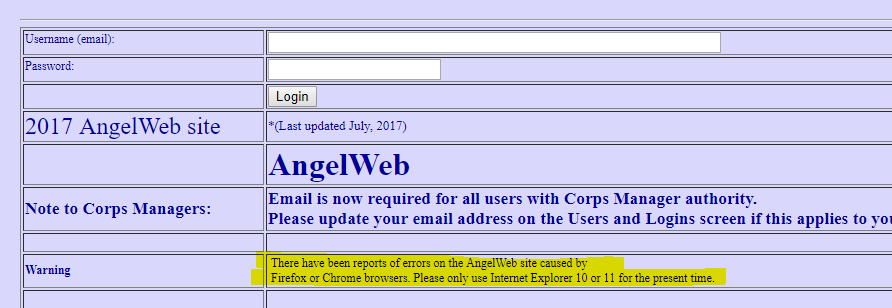
Known Browser issues when using something other than Microsoft Edge or Internet Explorer.
Internet Browser issues (Chrome / Firefox)
- At this time, Microsoft Edge or Internet Explorer are the only fully supported browsers.
See the warning on the login page:
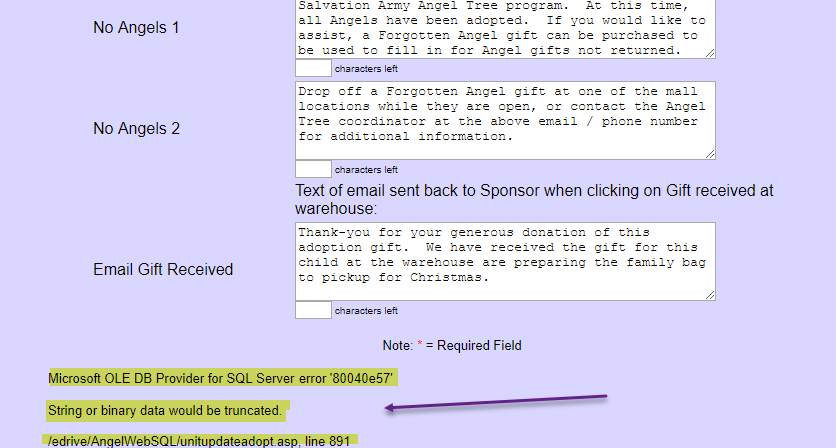
- Working in the Corps / Unit setup pages, a message is thrown and the page fails to save
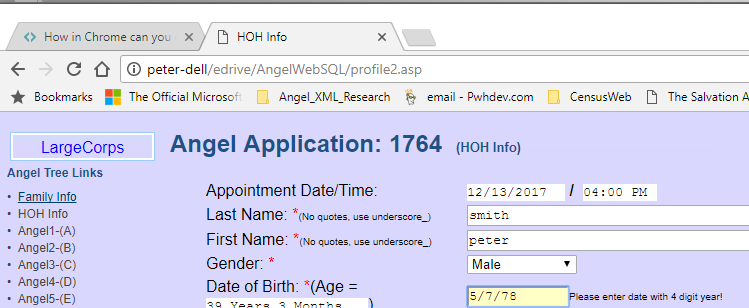
- Date validation loop when entering child/HOH DOB.
If you fail to enter a 4-digit year, the validation script goes into a loop
(Work around)
Since Chrome uses individual tabs as processes, you can close the tab in native Chrome,
you can use Shift+Esc to bring up the task manager (for Chrome) and end the tab there.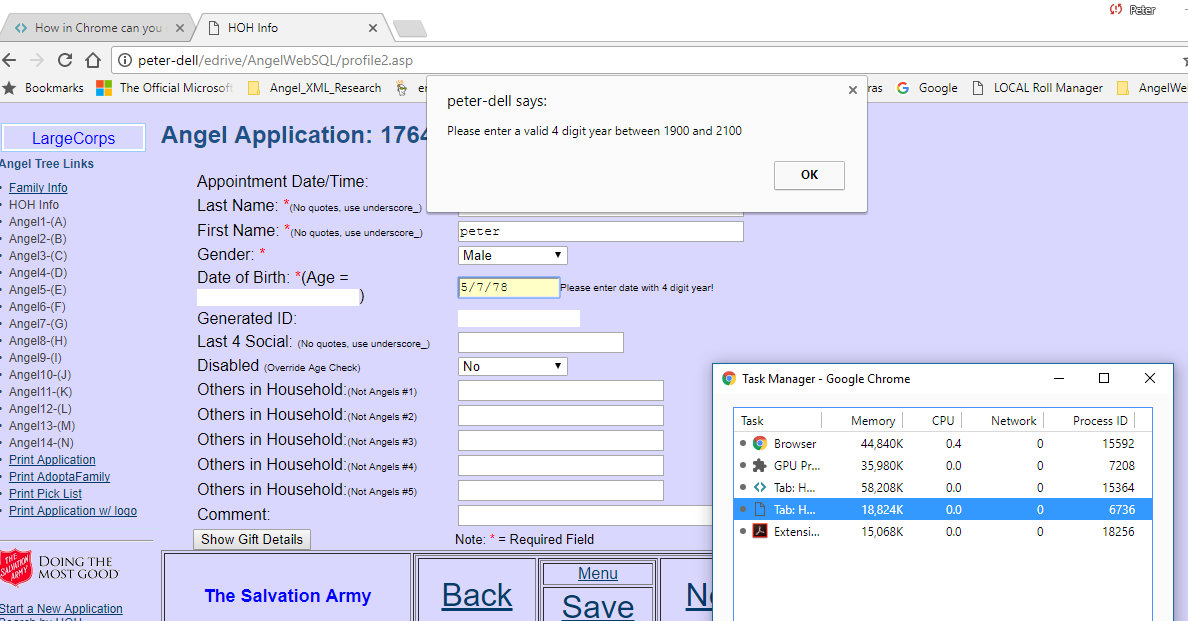
Click on reload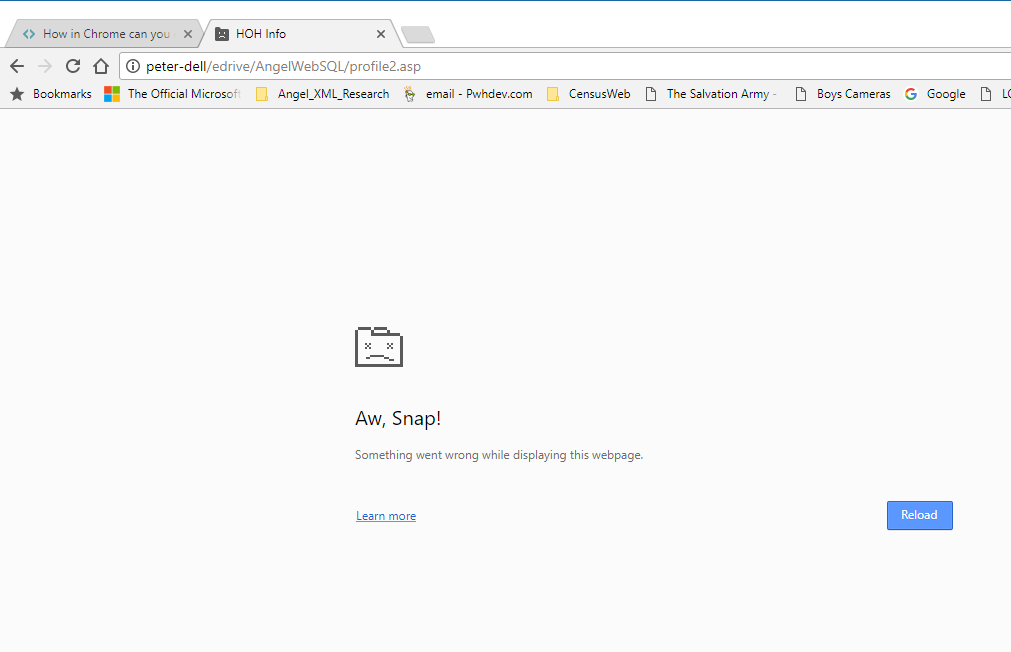
OR
Select the 3 dots and then undock to make it easier to see the whole dev tool window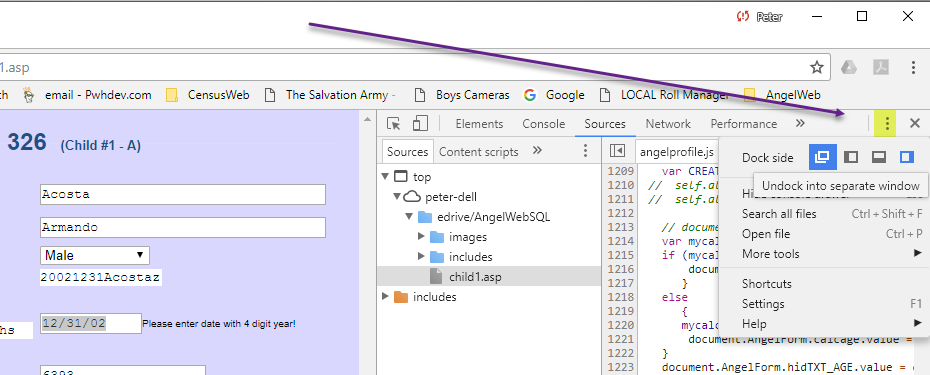
Click on the pause button to stop the script.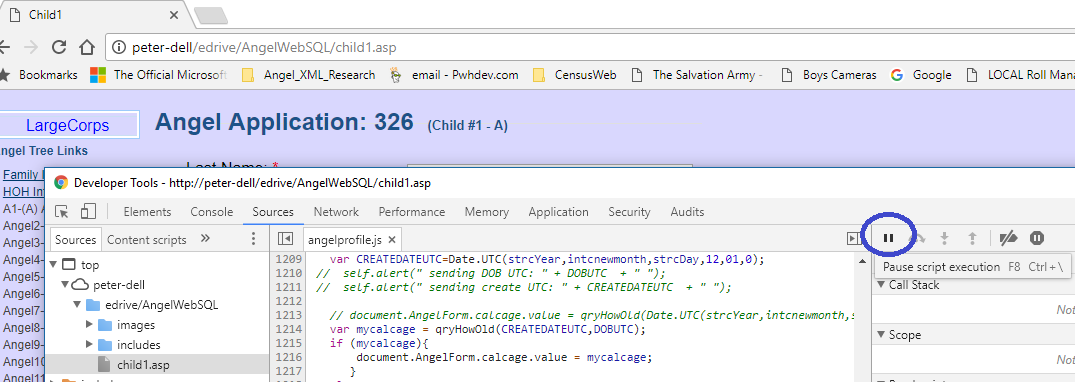
Click on the pause button to stop the script.
Then you can go fix the year to be 4 digits.
The following issues have been reported when using versions of Chrome or Firefox: